February 23, 2016

Grain Free Chocolate Chia Muffins

         
          Last week I ran a 1/2 marathon. I did not want to take the time to train, and decided to do it anyways. I wanted to prove to myself I could just get up and run 13.2 miles. And that I did. I ran with my brother in law, and we made it in under 2 hours, which was my goal. It was long, but surprisingly not that hard for me cardio-wise, however, it killed my knees. At mile 5 I was hurting bad, but I knew I was going to finish no matter what so I focused on finishing and ignored the pain. The next day was rough. I hurt everywhere, and my knees felt like they were about to break! After a few days everything was back to normal except my right foot. At first I thought it was just sore, and then the pain kept increasing. Long story short, I have a hairline fracture to deal with now. I get to wear this massive boot around for 5 weeks. I find it somewhat comical because 2 weeks ago I was talking to one of my trainers at the gym about how I need to take proper rest days. I joked about how I don't like to rest, and don't like taking time off. Now I get to eat my words! I have spent the last week "resting" and I am about to go crazy! I am forced to take 5 weeks from my normal activity and I am still trying to process that. Moral of the story: Don't run a 1/2 marathon without training! While I was completely capable of finishing, my body felt otherwise.


         Enough complaining. On to the muffins. I was experimenting with a few recipes (and realized halfway in I only had 1 cup of almond flour) and came up with this recipe that is more "scone" like than muffin. But since it is served in a tiny muffin tin were calling it a muffin. If you like a more moist muffin omit chia seeds, but it was perfect with some coffee, and the kids didnt seem to complain. The good news is there is no chocolate chips in it (just cocoa powder), so its super low in sugar and the perfect afternoon treat. We all know how much I look forward to my afternoon coffee and snack! Its the little things....

Chocolate Chia Muffins

Ingredients
1 cup almond flour
3 tablespoons cocoa powder
3 tablespoons coconut flour
1/2 cup tapioca flour
1/2 teaspoon sea salt
1/2 teaspoon baking soda
1/2 teaspoon ground cinnamon
Pinch of ground cloves
2 large eggs
1/4 cup melted butter or coconut oil
1/3 cup pure maple syrup or raw honey
1 1/2 teaspoons vanilla extract
1 tablespoon chia seeds*
raw sugar to sprinkle on top

* If you want a more moist muffin omit chia seeds

Directions
1. Preheat oven to 350 degrees and spray mini muffin tin with coconut oil spray, or line with baking cups.

2.In a large bowl mix the dry ingredients (except chia seeds), and whisk around to break up clumps.

3. In a medium sized bowl mix all wet ingredients and chia seeds. Let sit 10 minutes to let chia seeds soften a bit. Gently fold the wet ingredients into the dry.

4. Drop spoonfuls of batter into muffin tin, filling each about 3/4 of the way full. Sprinkle with a little raw sugar (if desired), and bake 10-14 minutes , until it springs to the touch, or knife inserted comes out clean.

January 22, 2016

Korean Chicken and Cauliflower Fried rice

It has taken me a long time to decide to get back into blogging. It is not because I didn't enjoy it, but it takes time. And time is not really my friend these days. BUT, every time I post a picture of my dinner a handfull of you ask me for the recipe. And I get emails weekly asking for tips, advice, or recipes on eating paleo and/or how to eat healthy. And while I could email each person individually I decided to get back on here and post some recipes. For me, blogs are my main source of recipe inspiration, so I hope I can do that for some of you!

This recipe was super easy and seriously delicious. I hadn't really decided I was going to blog it until after taking horrible iPhone pics and then it was gone. Like the entire dinner devoured before I could even think of getting the Canon out. O well. Next time I make it I will update the picture, but for now all you need to know is this is delicious, and easy, and very kid approved. Also I don't know how these bloggers get these amazing pictures at dinnertime. Im lucky to have everyone sitting waiting to eat. If I dare mention "hold on guys, mommy needs a picture" we would have some crying for sure . So it may be crappy iPhone pics for a while until I figure it all out again. Anyways. The Food.

Korean Chicken 
Recipe was slightly adapted from The Endless Meal

INGREDIENTS
 1.5-2lbs chicken thighs, drumsticks, breasts ( I used a mix of drumsticks and breasts)
4 tablespoons honey
2-3 tablespoons Siracha (or red chili paste)
2 tablespoons coconut aminos (or soy sauce)
1 tablespoon sesame oil
2 cloves garlic, finely minced
sesame seeds and green onions for garnish

DIRECTIONS

1. Place chicken in a resealable bag. Add the honey, siracha, coconut amigos, sesame oil, and garlic and seal the bag. Squish the bag around a little so that the marinade coats all the chicken. Let the chicken marinate 1-24 hours in the fridge.

2. Line an 8X11 baking dish with parchment paper . Preheat your oven to 425 degrees Fahrenheit.

3. Pour the chicken and all the marinade into the prepared baking dish and move the chicken around, so it is in a single layer. Bake in oven for 25-30 minutes, turning a few times. Once it is cooked through, Broil the chicken at 425 for another 10-15 minutes until it is nice and dark red. Be sure to keep a close eye on this as all broilers are different.

Cauliflower Fried Rice 
This is one of my all time favorite ways to eat cauliflower. It has so much flavor!

INGREDIENTS

1 large head of cauliflower ( riced in food processor ) * see notes
1-2 teaspoons avocado or olive oil
1 1/2 teaspoon sesame oil
1 1/2 teaspoons coconut aminos or soy sauce
1 egg, beaten
1/2 onion finely diced
2 cloves garlic finely minced
green onions for garnish
salt and pepper to taste

DIRECTIONS

1. In a large skillet (I used a cast iron), over medium high heat, add avocado oil and onions. Saute  a few minutes until onions start to soften, then add garlic and sauté 2 minutes. Add in riced cauliflower and saute 6-8 minutes until it just starts to soften, stirring often. Push the cauliflower to the side of the pan and add the beaten egg, cooking until soft scramble. Once egg is almost done, stir it all together. Add sesame oil and coconut aminos. Let cook another minute or so until everything is warmed through. Season with salt and pepper to taste, and add onion garnish .

* To rice cauliflower:
Working in batches, pulse small florets (just the cauliflower chunks) in food processor until it resembles rice This will take a few pulses . And Voila! You now have riced cauliflower ...

January 12, 2015

A New Year, A New Focus..... And some delicious Cauliflower "couscous"


It almost feels weird getting back into blogging. I have taken a super long break from it and have been focusing all of my time on my three littles. And I could not be enjoying my time more. But, as the oldest now spends over half his day in kindergarten, and my 3 year old will play by himself for hours, and my toddler takes a solid 2 hour nap everyday, I have found myself needing something for "me to be working on. Don't get me wrong, I love playing with these boys all day, but there are a few minutes in the day that I would like to be working on something for me. And I think my life is finally to a point that I can dedicate some time for it. So here I am. Back at it. And honestly I had no intentions of posting a recipe anytime soon, but I have had several people ask me when I am going to start posting recipes again, and I felt it was time. 

This year I am re-foscuing on feeding my family natural. whole foods. While we mostly eat that way anyways (besides a few treats here and there), I felt the need to re-energize myself on menu planning, exercising, and re-inventing our diet to be fun, satisfying, and completely free of processed anything! I am constantly being emailed by friends or even random people who know we eat well, asking me for advice on how to feed them and their kids, how to balance everything, and of course recipe suggestions. So here we are. A new year, and a new focus. I am focusing on using my talents and passions and helping others live a healthier and happier life! The picture below looks terrible. In fact the cauli "couscous" does not look at all appetizing! I didn't think to take a picture until we ate most of it and packaged up the rest for later. And I thought, maybe I would like to use this recipe sometime. Next time I make it I will update the picture, but until then trust me when I say this salad is seriously amazing. I had everyone eating it up! It is somewhat of a pain to make, but makes a huge batch and is so good the next day. Its a great way to fuel your body and enjoy what you are eating. Below I am posting a bit about the benefits of some of the ingredients in there .. Enjoy! 


Cauliflower: Cauliflower contains sulforaphane, a cancer fighting agent. It is a great anti-inflammatory and provides 77 percent of your daily need for vitamin C. 

Bean Sprouts: When you sprout anything, the Fiber, Protein and Vitamin content increase dramatically. Sprouting the lentils and beans also makes them much easier to digest. 

Avocado: Did you know avocados contain more potassium than a banana? Yup, thats right. They are also loaded with vitamins, from vitamin C, K,to all the B's. My favorite reason for eating them is they are loaded with monounsaturated Fatty Acids, making them the perfect healthy fat. I will be writing a post soon on the importance of eating lots of healthy fats :) 


Cauliflower "couscous"
Recipe adapted from Green Kitchen Stories 
Ingredients 
1 Large head of cauliflower (I used a mix of orange and white, thats why mine is a weird color)
1 handful parsley, chopped
1 handful cilantro, chopped 
1/2 cup diced bell peppers ( I used a mix of red and yellow) 
1/3 cup toasted pine nuts
1/4 cup feta cheese crumbled
1/4 cup (or so) of crunchy mixed sprouts, or broccoli sprouts
1 avocado, diced
2 tablespoons chopped green onions 
1 tablespoon capers
1 lemon, juice
1 tablespoon of avocado oil, or cold pressed olive oil
salt and pepper to taste

Preparation
1: Bring a saucepan with water to a boil
2: Meanwhile, coarsely chop the cauliflower and place the florets and stem in a food processor and pulse until fine couscous, or rice like texture. Do it in batches if it won't all fit. 
3: Pour the cauliflower into the boiling water, and lower heat to simmer and cook for 3 minutes (or slightly less).
4: Drain the cauliflower in a fine mesh sieve and let drain completely. You may have to spoon it around to let water run out. Pour into a serving bowl. Toss in everything but the avocado, feta and pine nuts and toss to combine. Serve warm, or I prefer it chilled. Once chilled, toss with avocado, pine nuts and feta and serve. 


A little green smoothie for me and these little monsters! 


April 15, 2013

Hummus


Let me start out by saying that this hummus recipe is really just a base for so many other flavor combinations. It is a simple, easy, low ingredient hummus, and you can enjoy as is, or take it in any direction. My boys absolutely love hummus, and I find it's the best way to get them to eat their veggies, plus they are getting extra protein with each bite. Now on to the recipe. 


Your Basic Hummus
makes about 2 cups

2 cans no salt added chickpeas, rinsed and drained well
1/3 cup tahini sauce (sesame paste)
1 large clove garlic, minced
juice of 1 lemon
1-3 tablespoons extra virgin olive oil (depending on consistency)
1/2 teaspoon ground cumin
salt and pepper to taste

In a food processor combine all ingredients and blend until smooth. Thats it. Enjoy!

March 18, 2013

Grain Free Coffee Cake


One thing I am passionate about is trying to live the most natural and healthy life we can, but it can be very challenging to eat, drink, sleep, and nourish our bodies naturally and healthfully. There are so many foods, products, and companies that use words to fool us into believing what we are putting in or on our bodies are "good" for us, when in reality half of those products have very harmful ingredients for our bodies. For me it starts with food. When feeding myself and my family, I try to feed us organic, natural whole foods. No packaged products with hidden ingredients. That being said it can be challenging and tedious and expensive to do so. One way I keep encouraged and reminded of these things is through a few blogs I read. They inspire me through food, life stories, and sharing their products they love as well. Also, it helps to have friends who are also doing the same. My closest friends are a good source for me on skincare products that are safe and natural, as well as vitamins and supplement referrals. One blog I love, and have been following for the past couple of years now is Roost Blog. She recently wrote a post about a skincare line that is natural and safe, and one that she loves. She has also collaborated with the skincare creator Tata Harper, and is giving away one of their products. I loved reading her post this morning because it reminded me of the importance of what we feed our skin as well. I hope you find it a good read, and find my natural recipes encouraging to you as well! Happy Monday! Update: If you are looking for a great line of makeup that is not toxic to your skin, Coco from Roostblog has also wrote a beautiful post about some great products as well! 


Grain Free Coffee Cake
Serves 6

For the Cake:


    2/3 cup honey 
    1/4 cup butter, melted
    4 eggs
    1/2 cup almond milk
    3/4 cup almond flour
    3/4 cup sifted coconut flour
    2 tsp. baking powder
    1/2 tsp. salt
1. Preheat oven to 350 degrees. Grease or butter an 8×8 baking pan.
2. Combine honey, butter, eggs and almond milk in a bowl until well combined.
3. Combine almond flour, coconut flour, baking powder and salt in a separate bowl.
4. Mix dry ingredients into wet ingredients. Stir well.
5. Pour HALF of the cake batter into the prepared cake pan and spread out evenly.
6. Prepare streusel.
Streusel Ingredients:
    1 cup chopped pecans
    2 Tbsp. honey
    1/4 cup butter
    1 1/2 tsp. cinnamon
    1 tsp. coconut flour
1. Combine all the streusel ingredients in a bowl.
2. Distribute half of the streusel over the batter in the pan.
3. Pour the rest of the cake batter on streusel and top with remaining streusel.
4. Bake at 350 degrees for 28-35 minutes. Remove from oven when a knife inserted in the middle comes out clean.

February 10, 2013

Harvest Muffins with Cashew Cream


Quick update on the Fam, then back to the food: We are now at week 16 in our pregnancy. I am so thankful we have made it past the first trimester blah. I am thankful to be cooking again, and making much better health choices. I actually feel pretty great now, and have most of my energy back. Woohoo! Emory started Montessori School 3 weeks ago, and loves it! I could not be more happy with our decision to send him there. He is blossoming, and growing, and learning, and seems to be enjoying every second of it! They are an amazing school, and I feel blessed to be giving my son the best education he can have right now. Adlai is now 18 months and boy does this kid have a personality. He is my goofball, my clown. He loves attention, and seems to get plenty of it :). He loves his brother and copies EVERY single thing Emory does. The boys are best buds, and look out for each other already. As a mom, there is nothing more rewarding and heart-melting then watching your kids have so much love and adoration for each other. ASSUMING this next baby is most likely a boy :), I am very excited to see how (he or she) gets to grow in love just like the other two. And lastly, my wonderful and giving husband. When we met I knew Toby was an ambitious man. And throughout our marriage he has achieved and accomplished A LOT. We celebrate our fifth year of marriage this year (in August), and I could not be more proud of the man I married. He is on the brink of some awesome new business adventures. He is an extremely terrific people person, and has found himself in this amazing network of people who are all entrepreneurs and of the like. I love seeing him grow, inspire, and be inspired. He is my best friend, and I am so lucky he works so so so very hard so me and our boys can stay home together and make the best memories I could ever ask for. Life is wonderful :), and we are so blessed. 


Now, back to the food. Seeing as how I am 16 weeks pregnant and need to be making smart health choices, I have been experimenting with a lot of grain free sweets, and have loved them all! Unfortunately I didn't have my camera for most of them. Finally yesterday I was able to photograph these delicious muffins. They are delicious and really moist. Packed full with carrots, apples and zucchini. Spiced with a hint of cinnamon, and finished with a dairy free cashew cream. Absolutely wonderful! 


Harvest Muffins with Cashew Cream
Gluten/Grain/Refined Sugar Free
Adapted from Roost Blog
For the Cake

  • 3 cups almond flour
  • 1 1/2 tsp baking soda
  • 1/2 tsp salt
  • 1 1/2 tsp cinnamon
  • 1/4 melted butter, ghee, or oil of choice
  • 1/4 cup honey
  • 1 1/2 tsp pure vanilla extract
  • 3 eggs
  • 1 cup grated zucchini
  • 1 cup grated apple
  • 1 cup grated carrot
Preheat Oven to 350F. Grease a muffin pan, or use individual molds as pictured above. In a bowl combine dry ingredients. In a separate bowl combine wet ingredients. Pour wet mixture into the dry mixture and stir to incorporate. Pour into greased tins and cook for 25-35 minutes, until a toothpick inserted into the center comes out clean.

For the Cashew Cream (Makes almost 2 Cups)
  • 1 cup raw cashews, soaked for 3 hours, water discarded
  • 1/2 cup fresh apple juice
  • 2 medjool dates, pitted
  • 1 TBS honey
  • 1 vanilla bean, seeds scraped, pod discarded
In a high speed blender combine ingredients until very smooth. Spread on muffins.

Cake can be stored in an airtight container for up to 4 days at room temperature, or refrigerated for a week. 


October 11, 2012

Pumpkin & Green onion Coconut Flour Biscuits


I don't know why but I am in a major blog block.. If that even makes sense. Life has been quite busy lately with two toddler boys, and 2 dogs (we added a new golden retriever puppy this month). Usually I have a long list of items to make for the blog, but I guess that list is lost in my mind somewhere. 


These biscuits are really tasty. But, i have to give a warning not to expect them to taste or have the texture of a normal biscuit. They are made with coconut flour, and have a completely different taste and texture which I happen to love. Plus they are packed with fiber and protein, and leave you feeling anything but full and sluggish like normal biscuits do. Coconut flour can be expensive, but in most recipes you use such a small amount that it really comes out quite cost efficient. Plus, most health food stores sell it in bulk which makes the world of difference on price. 


Despite the weather being still in the 90's here, I could not go another day without a pumpkin treat. Enjoy!


Pumpkin & Green Onion Coconut Flour Biscuits
Makes 10-12
I used THIS recipe as a base but didn't have bacon or shallots and really wish I had...

1/2 cups coconut flour
3/4 teaspoon baking soda
A scant less then 1/2 teaspoon salt
1/2 cup coconut oil 
1 tablespoon apple cider vinegar
1/2 cup plus 2 tablespoons 
roasted or canned pumpkin puree, room temp(or butternut squash)
3 large eggs (best at  room temp or the coconut oil will solidify)
1/4 cup green onions chopped or thinly sliced
1/2 cup shredded cheddar cheese

Directions: 

Preheat oven to 350 degrees F. Grease or line a baking sheet with parchment.

Combine coconut flour (scoop & sweep method, not packed), baking soda and salt. 

Add the coconut oil and beat till smooth. Note: This helps keep the coconut oil from hardening into little pieces later if your eggs/pumpkin happen to be cold. For best results though, let them come to room temp first. Try sticking the shelled eggs in a glass of hot water for about 3 minutes to speed up the process.

In a separate bowl combine the apple cider vinegar, pumpkin and eggs. Beat till smooth

Add the flour mixture, green onions and cheese to the liquid ingredients
. Mix all the ingredients until the batter becomes thick and well combined. If your eggs and/or pumpkin were cold the dough will be quite thick. This is fine.

Drop mounds of batter onto the prepared baking sheet. 
Use a heaping 1/8 of a cup per biscuit. Makes 8-10 biscuits.

Bake for about 15-18 min or until slightly golden. Times will vary from oven to oven and the thickness of the biscuit. Do not over bake or they can become dry. 

Allow to cool for 5-10 minutes before moving transferring from the pan. I fine these best eaten the same day that I make them..


August 29, 2012

Kale Chips


Kale chips. The new "healthy foodies" snack. I had to try. 


I love kale. I have tried kale (among other hearty greens) pretty much anyway you can imagine. In soups, raw in salads, steamed, sautéed...you get my point. I was expecting these to be my new favorite way to eat kale, and although they were super delicious and crunchy, I think I prefer my kale raw.  The chips were really good, and I will make them again, lots, because my boys loved them, and I love watching my boys experience food in a new way. Emory loves chips, but he only gets them on occasion, and now I have a way to let him eat his chips, but also create a healthy palate for him for the future. PERFECT. So go make some kale chips, I think you will be pleasantly surprised. 


On a side note: Hopefully you will be seeing posts more often now. I am so happy to say that my baby (He is 1, but he will be my baby for much longer than that :) is finally sleeping through the night! Praise the Lord! It only took a full year, but wow does it feel good to get some rest. Now I have more energy to keep up with everything.....

Kale Chips
I found that lacinto or dinosaur kale made the best chips because it is a lot more "crunchy" of a piece of kale, but has a more delicate, less bitter taste.

10-12 (or as many as you want) pieces of kale, stripped off the stem, torn or cut into whatever size pieces you want. (I know, not much of a recipe here)
Sea Salt
Olive Oil
Lemon juice (optional)

Preheat oven to 325 degrees. Wash and thoroughly dry kale. Lightly toss with a drizzle of olive oil. Lay flat on sheet pan. Sprinkle with sea salt and a small squeeze of lemon (if using). Bake for 25-30 minutes, or until kale is crisped and crunchy. Turn pieces over at halfway point. 

August 10, 2012

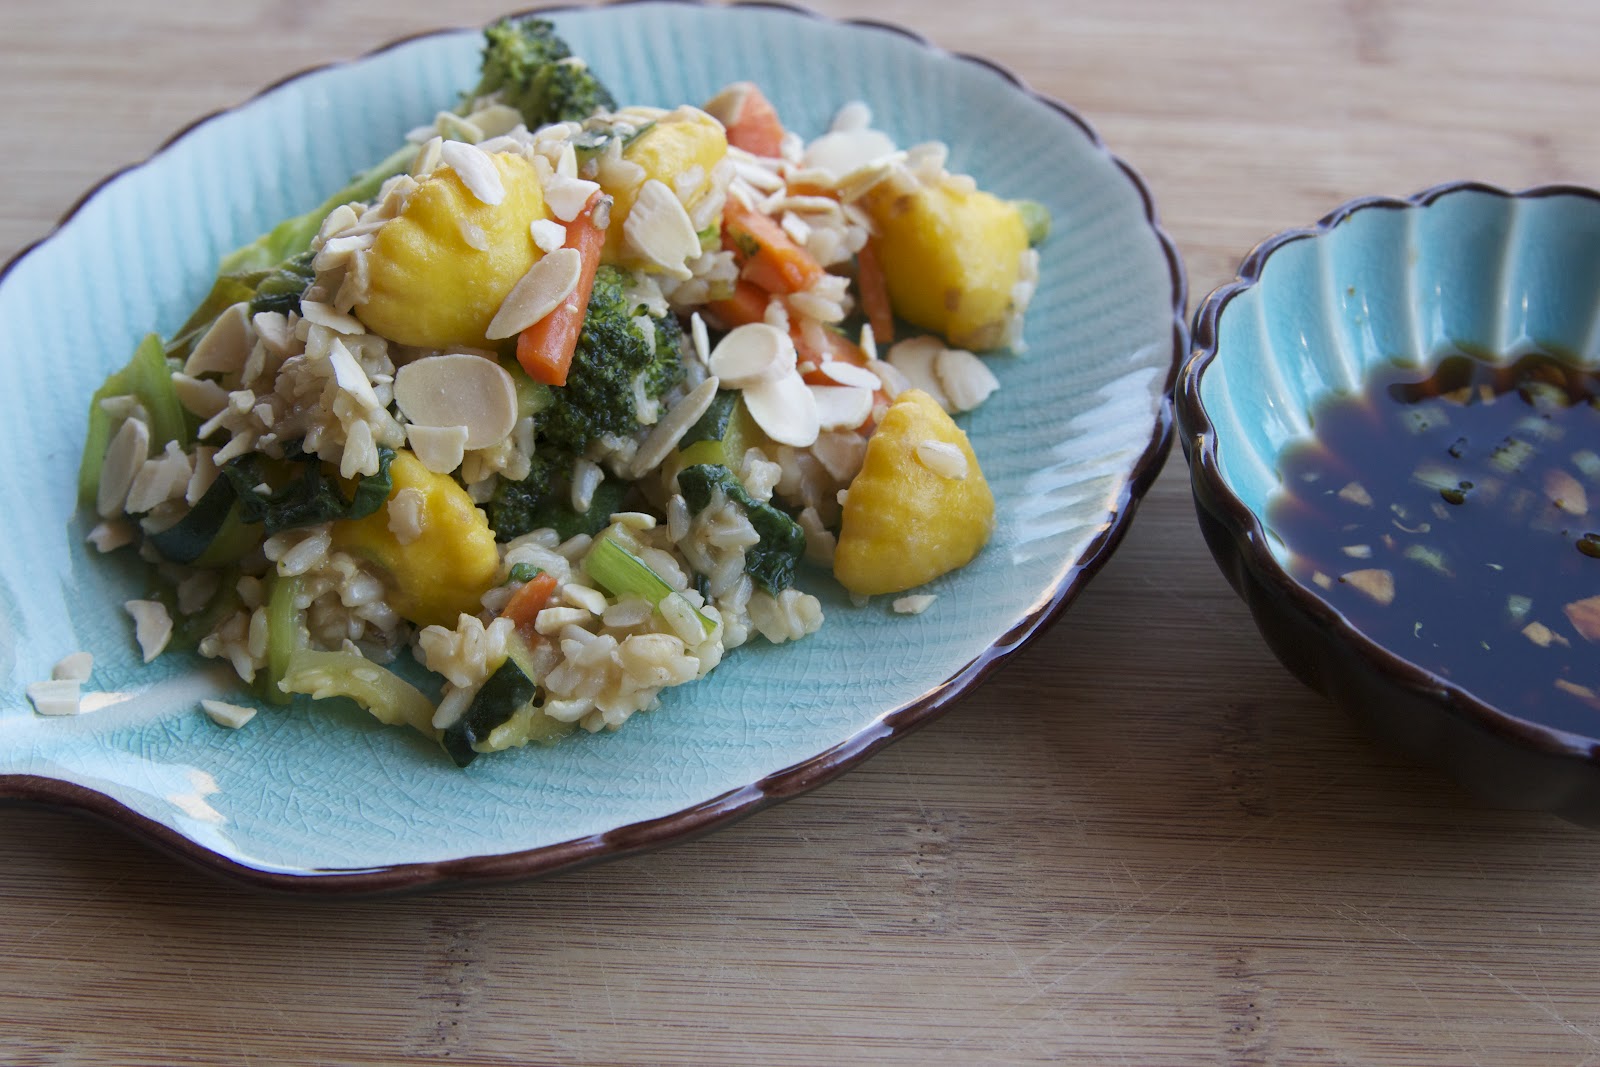
Summer Vegetable & Rice Stir Fry


I can't even begin to tell you how incredible the past year has been. We went from having one precious little boy, to growing by another sweet little baby boy. I say baby boy, but anyone who knows Adlai knows he is anything but baby (he seemed big and mature from 2 months on ). He is my loud, rowdy, smart, fussy, and most adorable little one year old. I love him to death (I love Emory just as much, but he is not my little boy anymore :( . Adlai has been a very testing and trying baby. He just finally started sleeping through the night, and he is a year old! Holy cow I forgot how good you can feel when you get a little rest. AMAZING. I grew a lot this year. I had to learn how to be a mother to not just one energy packed boy, but two. I was constantly trying to figure out how to get him to sleep better, but it took weaning him from nursing to do so. I had to learn how to find that little bit of time for myself despite what seemed like a complete lack of time & energy. I had to ask God continually for patience and kindness to flow from mouth (like the time I finally got laundry folded after what seemed like a week, and I re-fill my water which I never could seem to drink enough of, and turn around to see Emory had just dumped over the laundry basket and completely un-folded everything..if thats even possible. Only to be followed by him running into his brothers room and waking him up from a nap that took me 3 hours to finally get him to sleep). You know what I am talking about.


 Patience was hard to learn, and I am still continually needing the Lords help everyday from the second I wake up. BUT, despite the past year being a little hard to say the least, I learned how to be a better mom, still trying to learn how to balance time for my little boys, and time for my big boy (also known as my husband). That man is patient. SOmetimes annoyingly patient, but he has given me so much grace when I failed as a wife/mom. He continually loves me and encourages me, and is always there to help me through the rough days. He is my best friend, and this past year we have grown so much closer and I have the absolute most respect and love for my husband. I am so proud of him, and could not imagine a better father. This past year has been amazing. My heart is filled with joy every morning I wake up, knowing I will soon be greeted by two of the most precious boys I could dream of, and filled with love from a husband who world hard to give me and the boys everything we could every ask for. I could have never dreamed of a more fulfilling life. My sweet baby boy is 1 now, and well on his way to walking. I hate how time flys, and I wish more than anything that I could freeze time (except for the terrible 3's we seem to be facing right now) and soak up every second of time I have with my family. I can not even imagine how good life will be next year! 


Happy birthday little man...

Summer Vegetable & Rice Stir-Fry 
Makes 4-5 servings
I absolutely eat with my eyes, and using a fun variety of veggies here makes this dish so much more interesting. I love these little heirloom squash!

12-14 baby heirloom squash (or 2 large yellow summer squash), cut in half (or half moons for larger squash)
2 zucchini, cut into matchsticks (look at picture above)
4 large carrots, cut into matchsticks
1 large head of broccoli, cut into small florets
5-6 baby bok chou, roughly diced
4 cups cooked brown rice
olive oil for sautéing
Avocado and toasted sliced almonds for topping

In a large wok, or large pan (I use a cast iron pan). add 2 tablespoons oil and heat until very hot. Toss in veggies and sauté over high heat until veggies are tender but crisp. Season with sea salt and freshly cracked pepper. Once veggies are just about done, toss in rice and saute a few more minutes. Drizzle in sauce, and toss though. Remove from heat and serve with sliced avocado and almonds. I like to add a little extra siracha on top. Enjoy!

For the sauce:
3 green onions roughly chopped
1 clove of garlic, diced
4 tablespoons soy sauce
2-3 tablespoons honey (depending on desired sweetness)
juice of 1 lime
1/4 teaspoon Siracha (the red spicy chinese chile sauce that is taking over the world...I guess any hot sauce will do..)
1 tablespoon Rice Vinegar

Stir all ingredients together in a bowl. Can be made a day ahead.


July 31, 2012

Baked Zucchini Fritters


I love eating healthy and fresh. I especially love it when the food you cook tastes incredibly amazing. Let's face it, we want to enjoy the food we eat (and sometimes, but very rarely, that means chomping down on a ridiculously cheesy and greasy bite of pizza). I like to think I manage to cook healthy and keep it tasty most days, but there is that occasion when I try to re-create something "healthy" into an even healthier dish. I would like to say that this one is a winning meal. Not only is it packed full of veggies, but it tastes amazing and so full of flavor, not to mention they are baked not fried or sautéed. 
I especially love it when my kids and husband enjoy the meal just as much. I encourage all of you to start, and grow, a small herb garden in your home or backyard. I use fresh herbs in nearly every meal I prepare, and save a lot of money, not to mention the fact that you can be proud it came from your very own plants. Do it. Make it. Eat it. 

O, and because I was out of camera use (Toby has the camera cards full of wedding footage and I have yet to get them back :)), instagram has managed to supply me with decent enough pictures to give you an idea of how these fritters looked. 


Baked Zucchini Fritters
Makes 10-12 fritters

3 large zucchini, grated, excess water squeezed out (place grated zucchini in a paper towel and gently squeeze to get liquid out)
1 red onion, diced
1/2 red bell pepper, diced
2 cloves garlic, minced
2 green onion
1 tablespoon fresh basil, chopped
1 teaspoon fresh oregano, chopped
1/2 cup to 1 cup almond meal
1/2 cup crumbled feta cheese
1 egg, lightly beaten
1 teaspoon olive oil
salt and pepper as needed

Preheat oven to 375 degrees. 
In a medium skillet, heat oil, and sauté onion, bell pepper, and garlic until softened.  Set aside to cool

In a large bowl mix all ingredients, making sure all water has been drained from zucchini first. Scoop into even sized patties, and place on a lightly greased cookie sheet, or parchment paper. Place in freezer for 20 minutes so everything can set and hold together. Drizzle with olive oil and bake for 25-35 minutes, or until browned. 


July 19, 2012

Chocolate Peanut Butter Ice Cream (Vegan)


Summertime with kids can be rough. It's too hot to play outside, and a kid can only sit in front of a t.v for so long before even they get bored, plus I do not feel good about my kids watching that much T.V (seems so wasteful of their minds), so I don't allow that much time spent sitting idle like that. If I had girls I think it would be a little different. Maybe they would enjoy cooking and cleaning with me, or sitting and coloring for hours. Or maybe they would be just like my precious boys who love being outside just as much as their mommy. Adlai is still small enough that it is not too bad, but Emory is ready for cooler weather (or maybe just I am). Today we made ice cream together. Usually he is not interested in helping me cook or bake, but he always loves testing my creations, and probably more than anything loves the dessert ones. He was so sweet. He sat by the ice cream machine patiently (well as patient as he could) waiting for it to be done. When it finished and I scooped it all into a container, I gave him the ice cream machine bowl, and let him have at it. I usually don't encourage big messes, but today it was much needed, and I don't think there is many cuter things than a 3 year old, in his undies (when is he not??), completely covered in (healthy) chocolate ice cream! He loved it, and had no idea it was actually a dairy free, refined sugar free protein filled treat. This mommas heart was filled. I love seeing my boys get excited, especially when it is over something I have created! 


Chocolate Peanut Butter Ice Cream
Dairy Free/Refined Sugar Free
Makes about 2 cups

1 can full fat coconut milk
3 tablespoons honey or agave
2 heaping tablespoons cocoa powder
1 teaspoon ground cinnamon
1 teaspoon vanilla extract
2 ripe (but not overripe) bananas
3 tablespoons crunchy natural peanut butter (the kind with peanuts as the only ingredient) 
1/4 cup toasted almonds, roughly chopped

In a saucepan warm coconut milk, honey, cocoa powder, and cinnamon until all powder is dissolved. 

Place the rest of the ingredients, and the coconut milk mixture in a blender and blend until fully mixed. Place in ice cream maker and make according to manufacturers instructions. When the ice cream starts to become solid, add in almonds, and let mix through a few more minutes. Scoop into a sealed container, and freeze for a couple hours until hardened. (or you can eat it right from the machine like we do :)